Skip to content →

Étiquette : Routinator

RPKI – Routinator Monitoring and debug

I can’t stop digging around Routinator. See previous posts to understand everything 😀

Routinator provides an http interface to check about its inside, from metrics to status through VRPs debug.

Metrics

Go to your server on your URL http://srv-rpki01:8080/metrics and you will get the following output that can be pushed to Prometheus (or anything else !)

# HELP routinator_valid_roas number of valid ROAs seen
# TYPE routinator_valid_roas gauge
routinator_valid_roas{tal="ripe"} 13845
routinator_valid_roas{tal="arin"} 6108
routinator_valid_roas{tal="apnic"} 5677
routinator_valid_roas{tal="afrinic"} 555
routinator_valid_roas{tal="lacnic"} 3114

# HELP routinator_vrps_total total number of VRPs seen
# TYPE routinator_vrps_total gauge
routinator_vrps_total{tal="ripe"} 76757
routinator_vrps_total{tal="arin"} 8570
routinator_vrps_total{tal="apnic"} 33528
routinator_vrps_total{tal="afrinic"} 975
routinator_vrps_total{tal="lacnic"} 8475

# HELP routinator_last_update_start seconds since last update started
# TYPE routinator_last_update_start gauge
routinator_last_update_start 2004

# HELP routinator_last_update_duration duration in seconds of last update
# TYPE routinator_last_update_duration gauge
routinator_last_update_duration 39

# HELP routinator_last_update_done seconds since last update finished
# TYPE routinator_last_update_done gauge
routinator_last_update_done 1965

# HELP routinator_serial current RTR serial number
# TYPE routinator_serial gauge
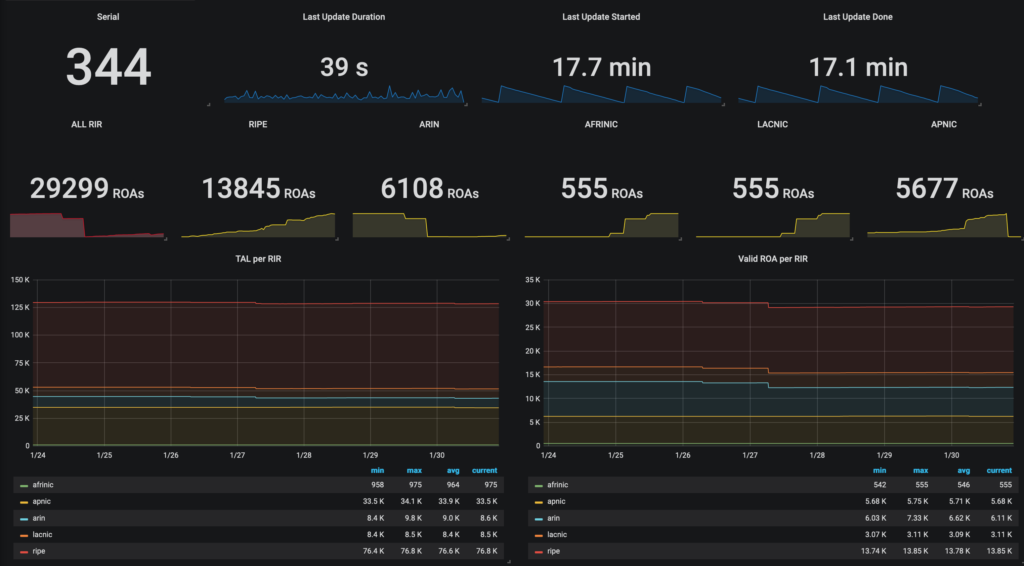
routinator_serial 344

It will help you to create dashboard on Grafana like the following one :

Status

Go to http://srv-rpki01:8080/status and you will access Routinator status

serial: 344
last-update-start-at:  2020-01-30 20:41:45.411133392 UTC
last-update-start-ago: PT2280.370308920S
last-update-done-at:   2020-01-30 20:42:24.618050797 UTC
last-update-done-ago:  PT2241.163391515S
last-update-duration:  PT39.206927565S
valid-roas: 29299
valid-roas-per-tal: ripe=13845 arin=6108 apnic=5677 afrinic=555 lacnic=3114 
vrps: 128305
vrps-per-tal: ripe=76757 arin=8570 apnic=33528 afrinic=975 lacnic=8475 
rsync-durations:
   rsync://rpki.ripe.net/ta/: status=0, duration=0.042s
   rsync://rpki.apnic.net/repository/: status=0, duration=3.146s
   rsync://rpki.arin.net/repository/: status=0, duration=4.312s
   rsync://rpki-repository.nic.ad.jp/ap/: status=0, duration=8.018s
   rsync://rpki.afrinic.net/repository/: status=0, duration=11.770s
   rsync://repository.lacnic.net/rpki/: status=0, duration=6.843s
   rsync://rpki-repo.registro.br/repo/: status=0, duration=7.629s
   rsync://localhost/repo/: status=10, duration=0.004s
rrdp-durations:
   https://rrdp.ripe.net/notification.xml: status=200, duration=1.590s
   https://rrdp.apnic.net/notification.xml: status=200, duration=4.034s
   https://ca.rg.net/rrdp/notify.xml: status=200, duration=0.492s
   https://rpki.cnnic.cn/rrdp/notify.xml: status=200, duration=2.294s
   https://rpki-repo.registro.br/rrdp/notification.xml: status=200, duration=1.428s
   https://rrdp.rpki.nlnetlabs.nl/rrdp/notification.xml: status=200, duration=0.280s
   https://rrdp.arin.net/notification.xml: status=200, duration=0.910s
   https://rpki-ca.idnic.net/rrdp/notification.xml: status=200, duration=1.278s
   https://rrdp.twnic.tw/rrdp/notify.xml: status=200, duration=1.433s
   https://localhost:3000/rrdp/notification.xml: status=-1, duration=0.001s

Other methods

JSON and other output formats

Want to check about a prefix ? Check on http://srv-rpki01:8080/json, you will be able to fetch all ROAs into JSON format. Other methods exist to fetch ROAs in multiple formats, read the following: Routinator Docs – The HTTP Daemon

Check Validity

For example, go on http://srv-rpki01:8080/validity?asn=13335&prefix=1.1.1.0/24, you will be able to check validity for prefix 1.1.1.0/24 from AS13335 :

{
  "validated_route": {
    "route": {
      "origin_asn": "AS13335",
      "prefix": "1.1.1.0/24"
    },
    "validity": {
      "state": "Valid",
      "description": "At least one VRP Matches the Route Prefix",
      "VRPs": {
        "matched": [
          {
            "asn": "AS13335",
            "prefix": "1.1.1.0/24",
            "max_length": "24"
          }

        ],
        "unmatched_as": [
        ],
        "unmatched_length": [
        ]      }
    }
  }
}

Lets say, it’s the same than running a command on the server :

routinator@srv-rpki01:~$ routinator vrps -p 1.1.1.0/24
ASN,IP Prefix,Max Length,Trust Anchor
AS13335,1.1.1.0/24,24,apnic

But sometimes, it could help to be faster for the debug to query the API method directly.

If you want to check if it’s still valid for AS1 :

{
  "validated_route": {
    "route": {
      "origin_asn": "AS1",
      "prefix": "1.1.1.0/24"
    },
    "validity": {
      "state": "Invalid",
      "reason": "as",
      "description": "At least one VRP Covers the Route Prefix, but no VRP ASN matches the route origin ASN",
      "VRPs": {
        "matched": [
        ],
        "unmatched_as": [
          {
            "asn": "AS13335",
            "prefix": "1.1.1.0/24",
            "max_length": "24"
          }

        ],
        "unmatched_length": [
        ]      }
    }
  }
}

Routinator has many options to be monitored and daily used to check if there is something wrong on RPKI. It’s a real powerful tool for people who want to implement quickly and simply RPKI / Resource Origin Validation with some exceptions possible (SLURM)

4 Comments

RPKI – More Routinator …

Following previous article on RPKI – Use Routinator with Cisco IOS-XR, you will find here some tips to run routinator in a production environnement.

routinator configuration

Routinator can be started with a configuration file as below :

routinator@srv-rpki01:~$ cat .routinator.conf
# Routinator Configuration
#
# The configuration file is a TOML file. It consists of a sequence of
# key-value pairs, each on its own line. Strings are to be enclosed in
# double quotes. Lists of values can be given by enclosing a
# comma-separated sequence of these values in square brackets.
#
# See https://github.com/toml-lang/toml for detailed information on the
# format.
#
# This file contains all configuration settings with explanations and their
# default values.

# Repository directory
#
# This is where Routinator stores the local copy of the RPKI repository.
# Any relative path is interpreted with respect to the directory this config
# lives in.
#
# This setting is mandatory.
#
repository-dir = "/home/routinator/.rpki-cache/repository/"

# Trust Anchor Locator (TAL) directory
#
# All the files with the extension ".tal" in this directory are treated as
# trust anchor locators for RPKI validation.
#
# A relative path is interpreted with respect to the directory this config
# lives in.
#
# This setting is mandatory.
#
tal-dir = "/home/routinator/.rpki-cache/tals/"

# Local exceptions files
#
# This settings contains a array of paths to files that contain local
# exceptions. The files are JSON files according to RFC 8416 (aka SLURM).
exceptions = [
	"/home/routinator/.exceptions.slurm"
]

# Strict mode
#
# If strict mode, Routinator will stick to the requirements in the respective
# RFCs very strictly. See
# https://github.com/NLnetLabs/rpki-rs/blob/master/doc/relaxed-validation.md
# for information on what is allowed when strict mode is off.
#strict = false

# Rsync command
#
# This is the command to run as rsync. This is only command, no options.
rsync-command = "rsync"

# Rsync arguments
#
# This is a list of arguments to give to rsync.
#rsync-args = []

# Number of parallel rsync commands
#
# This is the maximum number of rsync commands that are run in parallel.
# We are not sure, if the current default is any good. Some feedback whether
# it is causing trouble or whether a higher value would even be fine is very
# much appreciated.
#
#rsync-count = 4

# Number of validation threads
#
# The number of threads that are used for validating the repository. The
# default value is the number of CPUs.
validation-threads = 2

# Refresh interval
#
# How often the repository should be updated and validated in RTR mode.
# Specifically, this is the number of seconds the process will wait after
# having finished validation before starting the next update.
#
# The default is the value indirectly recommended by RFC 8210.
refresh = 3600

# RTR retry interval
#
# This is the time an RTR client is told to wait before retrying a failed
# query in seconds.
retry = 600

# RTR expire interval
#
# This is the time an RTR client is told to keep using data if it can't
# refresh it.
# default = 7200 (2h) set to 6h
expire = 21600

# History size
#
# The number of deltas to keep. If a client requests an older delta, it is
# served the entire set again.
#
# There was no particular reason for choosing the default ...
history-size = 10

# Listen addresses for RTR TCP transport.
#
# This is an array of strings, each string a socket address of the form
# "address:port" with IPv6 address in square brackets.
rtr-listen = ["0.0.0.0:3323"]

# Listen addresses for Prometheus HTTP monitoring endpoint.
#
# This is an array of strings, each string a socket address of the form
# "address:port" with IPv6 address in square brackets.
#
# Port 9556 is allocated for the routinator exporter.
# https://github.com/prometheus/prometheus/wiki/Default-port-allocations
#
http-listen = ["0.0.0.0:8080"]

# Log level
#
# The maximum log level ("off", "error", "warn", "info", or "debug") for
# which to log messages.
log-level = "info"

# Log target
#
# Where to log to. One of "stderr" for stderr, "syslog" for syslog, or "file"
# for a file. If "file" is given, the "log-file" field needs to be given, too.
#
# Can also be "default", in which case "syslog" is used in daemon mode and
# "stderr" otherwise
log = "file"

# Syslog facility
#
# The syslog facility to log to if syslog logging is used.
#syslog-facility = "daemon"

# Log file
#
# The path to the file to log to if file logging is used. If the path is
# relative, it is relative to the directory this config file lives in.
log-file = "/home/routinator/logs/routinator.log"

# Daemon PID file
#
# When in daemon mode, Routinator can store its process ID in a file given
# through this entry. It will keep that file locked while running. By default,
# no pid file is used.
pid-file = "/home/routinator/routinator.pid"

# Daemon working directory
#
# If this entry is given, the daemon process will change its working directory
# to this directory. Otherwise it remains in the current directory.
#working-dir = "/home/routinator/"

# Daemon Chroot
#
# If this entry is given, the daemon process will change its root directory to
# this directory. Startup will fail if any of the other directories given is
# not within this directory.
#chroot = ...

Please note the file /home/routinator/.exceptions.slurm will be used to create ROA/ROV exceptions.

Example below shows how to drop ROA received from TAL for ASN 65551, then create after local ROA exceptions for the prefix TEST-NET2 198.51.100.0/24, with a maxPrefixLength /24 and from ASN 65551.

routinator@srv-rpki01:~$ cat .exceptions.slurm
{
  "slurmVersion": 1,
  "validationOutputFilters": {
   "prefixFilters": [
      {
        "asn": 65551,
        "comment": "All VRPs matching our ASN 65551 as we do assertions below"
      }
   ],
   "bgpsecFilters": [
   ]
  },
  "locallyAddedAssertions": {
   "prefixAssertions": [
      {
      	"asn": 65551,
      	"prefix": "198.51.100.0/24",
      	"maxPrefixLength": 24,
      	"comment": "IPv4 TEST-NET2"
      }
   ],
   "bgpsecAssertions": [
   ]
  }
}

Doing so will permit to create an ROA exception, distributed to your routers running RPKI. It will allow to permit this prefix to be considered as valid on your BGP infrastructure / routers running ROV, despite TAL valid, invalid and/or unknown RPKI state.

Note : this is not propagated to TAL. And it should used only in emergency for certain circumstances. I create a temporary hack deployed by Ansible for invalid ROAs which are not well declared by the originator (yes it happen). It could occur for some prefixes when moving property of some blocks or moving from RIR to another. In this case, unwanted behaviour for your customer can occur and you need to create temporary exceptions to keep the route in your BGP RIB.

If you need more details on how SLURM are defined and used, please take a look on :

systemd and routinator

To start automatically routinator with systemd, you just have to create the following unit file :

root@srv-rpki01:~# cat /etc/systemd/system/routinator.service
[Unit]
Description=Routinator RPKI daemon
After=network.target

[Service]
User=routinator
Group=routinator
RuntimeDirectory=routinator
RuntimeDirectoryPreserve=yes
RuntimeDirectoryMode=755

Environment=""
PIDFile=/home/routinator/routinator.pid

ExecStart=/home/routinator/.cargo/bin/routinator server --pid-file /home/routinator/routinator.pid --user routinator
Restart=on-failure

[Install]
WantedBy=multi-user.target

Then enable and start it :

root@srv-rpki01:~# systemctl start routinator.service && tail -f /home/routinator/logs/*

root@srv-rpki01:~# systemctl status routinator.service
● routinator.service - Routinator RPKI daemon
   Loaded: loaded (/etc/systemd/system/routinator.service; enabled; vendor preset: enabled)
   Active: active (running) since Mon 2020-01-13 12:31:40 UTC; 2 weeks 3 days ago
 Main PID: 13469 (routinator)
    Tasks: 9 (limit: 2361)
   CGroup: /system.slice/routinator.service
           └─13469 /home/routinator/.cargo/bin/routinator server --pid-file /home/routinator/routinator.pid --user routinator

Jan 13 12:31:40 srv-rpki01 systemd[1]: Started Routinator RPKI daemon.

root@srv-rpki01:~# systemctl daemon-reload

root@srv-rpki01:~# systemctl enable routinator.service

Next : How to monitor Routinator !

2 Comments

RPKI – Use Routinator with Cisco IOS-XR

While digging about how to drop invalid ROA, I tested Routinator setup. Installing Routinator RPKI-RTR Cache validator is pretty easy using their documentation.

curl https://sh.rustup.rs -sSf | sh
source ~/.cargo/env
cargo install routinator
routinator init
# Follow instructions provided
routinator server --rtr 127.0.0.1:3323

When this is done, you can then start configuration on the router. I almost work daily on Cisco IOS-XR platform (on ASR9K hardware). And in fact, there are some tricks to do for this to work, as IOS-XR support only RTR protocol over Secure Transport (SSH for example).

Configure RPKI server and secure transport

On the RPKI server, you should create a new user for SSH secure transport for RTR protocol

adduser rpki

Then you should setup a sub-system on sshd_config

# cat /etc/ssh/sshd_config
[...]
PermitRootLogin no
# needed for user RPKI
PasswordAuthentication yes
[...]
# Define an `rpki-rtr` subsystem which is actually `netcat` used to proxy STDIN/STDOUT to a running `routinator rtrd -a -l 127.0.0.1:3323`
Subsystem       rpki-rtr        /bin/nc 127.0.0.1 3323
[...]
# Certain routers may use old KEX algos and Ciphers which are no longer enabled by default.
# These examples are required in IOS-XR 5.3 but no longer enabled by default in OpenSSH 7.3
Ciphers +3des-cbc
KexAlgorithms +diffie-hellman-group1-sha1

When you’ve done this, we can move on the IOS-XR side to setup RPKI server.

Configure IOS-XR RPKI server

To configure IOS-XR, you’ll need first to setup RPKI server using SSH username and password (which will be not shown after commit in the configuration).

router bgp 64567
!
 rpki server 1.2.3.4
  username rpki
  password rpkipassword
  transport ssh port 22
  refresh-time 3600
  response-time 600

When this is done, you will need to setup SSH client, as yes, IOS-XR ssh client is still using Cisco SSH v1.99 protocol version ! You can also setup vrf source and interface source if needed. Take care, some releases, like eXR (IOS-XR x64 version) in 6.1.x will not support ssh client v2 option …

ssh client v2
ssh client vrf myVRF
ssh client source-interface Loopback10

Then after, connection should be established

bgp[1064]: %ROUTING-BGP-5-RPKI_ADJCHANGE : 1.2.3.4 UP

RP/0/RP0/CPU0:router#sh bgp rpki summary

RPKI cache-servers configured: 1
RPKI database
  Total IPv4 net/path: 97550/105601
  Total IPv6 net/path: 15818/17522

RP/0/RP0/CPU0:router#sh bgp rpki server 1.2.3.4

RPKI Cache-Server 1.2.3.4
  Transport: SSH port 22
  Connect state: ESTAB
  Conn attempts: 1
  Total byte RX: 4080600
  Total byte TX: 7652
SSH information
  Username: rpki
  Password: *****
  SSH PID: 674259340
RPKI-RTR protocol information
  Serial number: 727
  Cache nonce: 0x79CA
  Protocol state: DATA_END
  Refresh  time: 3600 seconds
  Response time: 600 seconds
  Purge time: 60 seconds
  Protocol exchange
    ROAs announced: 131296 IPv4   23152 IPv6
    ROAs withdrawn:  25695 IPv4    5630 IPv6
    Error Reports :      0 sent       0 rcvd

Then now, you can enable ROV on IOS-XR, based on the RPKI table

RP/0/RP0/CPU0:router#sh bgp rpki table

  Network               Maxlen          Origin-AS         Server
  1.0.0.0/24            24              13335             1.2.3.4
  1.1.1.0/24            24              13335             1.2.3.4
  1.6.132.240/29        29              9583              1.2.3.4
  1.9.0.0/16            24              4788              1.2.3.4
  1.9.12.0/24           24              65037             1.2.3.4
  1.9.21.0/24           24              24514             1.2.3.4
[...]

Enable Route Origin Validation on IOS-XR

As stated in the Cisco documentation : BGP Prefix Origin Validation Based on RPKI, and thanks to a Cisco SE, I’ve discover that “Starting from Release 6.5.1, origin-as validation is disabled by default, you must enable it per address family”.

router bgp 64567
 !
 address-family ipv4 unicast
  bgp origin-as validation enable
  bgp bestpath origin-as use validity
  bgp bestpath origin-as allow invalid
 !
 address-family ipv6 unicast
  bgp origin-as validation enable
  bgp bestpath origin-as use validity
  bgp bestpath origin-as allow invalid
 !

In fact, if you enable “bgp bestpath origin-as use validity“, you should take care on how the BGP Best Path Selection is modified. See Patel NANOG presentation about Cisco’s Origin Validation Implementation. Reading this, BGP will prefer Valid pathes over Not-known path (over Invalid ones if you allow it). It means eBGP paths received on iBGP sessions will probably will be removed sooner from Best Path Selection algorithm, even if Local-Pref or Med is preferred on iBGP received paths due to a higher priority on the tie break for RPKI ROV.

bgp bestpath origin-as use validity behavior

During BGP best path selection, the default behavior, if neither of the above options is configured, is that the system will prefer prefixes in the following order:
Those with a validation state of valid.
Those with a validation state of not found.
Those with a validation state of invalid (which, by default, will not be installed in the routing table).
These preferences override metric, local preference, and other choices made during the bestpath computation.

You should use the useful command to understand and check impact.

RP/0/RP0/CPU0:router# sh bgp 1.1.1.0/24 bestpath-compare

On my side, I prefer to drop invalid using route policies on the eBGP sessions, so I can keep control. So I do not use bestpath validation :

router bgp 64567 bgp origin-as validation time 30
router bgp 64567 address-family ipv4 unicast bgp origin-as validation enable
router bgp 64567 address-family ipv4 unicast bgp bestpath origin-as allow invalid
router bgp 64567 address-family ipv6 unicast bgp origin-as validation enable
router bgp 64567 address-family ipv6 unicast bgp bestpath origin-as allow invalid

To drop invalid on each eBGP sessions, I simply use the following standard route-policy :

route-policy RP_DROP_RPKI_INVALID
  if validation-state is invalid then
    drop
  endif
end-policy

This RPL is called at start when dropping some Bogons Prefixes (aka Martians) or ASN.

route-policy RP_EBGP_PEER_IN
  apply RP_DROP_BOGONS
  apply RP_DROP_DEFAULT_ROUTE
  apply RP_DROP_RPKI_INVALID
  [...]
end-policy

Then you’ve done 😉 Next article : how to setup Routinator with configuration file and SLURM exceptions file.

11 Comments
fr_FRFR